Showing posts with label firebase. Show all posts

As discussed in our previous posts, we have learned how to perform email authentication and phone number authentication with firebase i...

Firebase Google plus Authentication in Android Firebase Google plus Authentication in Android

A blog about android developement

firebase

As discussed in our previous posts, we have learned how to perform email authentication and phone number authentication with firebase in android. In this article, we will how to perform Google Plus authentication in Android.

You can find my previous posts from following,

  1. Firebase Email Authentication

  2. Firebase Phone Authentication

Firebase G-Plus Authentication:

Firebase facilities Developers to manage Google plus Authentication in Easy way. Before starting, we have add or enable Google plus Authentication in Firebase console.

Firebase Setup:

Before start coding, we have to setup firebase for android and enable Phone Authentication. If you are new to firebase, the following link will be useful to know the method for setting up the project in firebase.

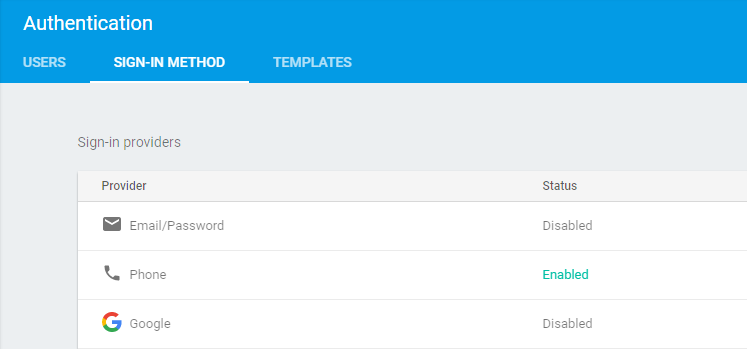
After setting up, open Authentication sign in method and enable phone authentication method as shown in the following figure.

You should Add SHA Fingerprint in your application. The following terminal will be used to get the SHA Fingerprint with Command Prompt in Windows for debug mode.

keytool -list -v -keystore "%USERPROFILE%\.android\debug.keystore" -alias androiddebugkey -storepass android -keypass android

Coding Part:

Steps:

I have split this part into 3 steps as in the following.

Step 1: Creating New Project with Empty Activity.

Step 2: Setting up the Firebase Library.

Step 3: Implementation of Firebase Google Plus Authentication.

Step 1: Creating New Project with Android Studio

  1. Open Android Studio and Select Create new project.

  2. Name the project as your wish and select your activity template.


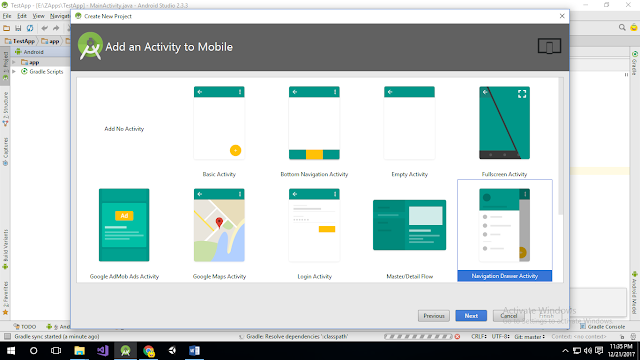
  3. Click “finish” button to create new project in Android Studio.

Step 2: Setting up the Firebase Library

In this part, we will see how to setup the library for the project.

  1. Open your project level build.gradle file and add the following lines in dependencies.

    dependencies {
        …
        classpath 'com.google.gms:google-services:4.0.1'
        …
    }
  2. Then add the following lines in allprojects in project level build.gradle file.

    allprojects {
        repositories {
            google()
            jcenter()
            maven {
                url "https://maven.google.com"
            }
        }
    }
  3. Then add the following lines in app level build.gradle file to apply google services to your project.

    dependencies {
        ...
        implementation 'com.google.firebase:firebase-auth:16.0.2'
        implementation 'com.google.android.gms:play-services-auth:15.0.1'
        implementation 'com.squareup.picasso:picasso:2.71828'
    }
    apply plugin: 'com.google.gms.google-services'
  4. Then click “Sync Now” to setup your project.

Step 3: Implementation of Firebase Google plus Authentication:

Initialize Google Sign in Client with Google Sign in options and Firebase Auth Client like shown in below snippet.

//first we initialized the Firebase Auth object
FirebaseAuth mAuth = FirebaseAuth.getInstance();

//Then we need a GoogleSignInOptions object
//And we need to build it as below
GoogleSignInOptions gso = new GoogleSignInOptions.Builder(GoogleSignInOptions.DEFAULT_SIGN_IN)
  .requestIdToken(getString(R.string.default_web_client_id))
  .requestEmail()
  .build();

//Then we will get the GoogleSignInClient object from GoogleSignIn class
GoogleSignInClient mGoogleSignInClient = GoogleSignIn.getClient(this, gso);

You must pass your server's client ID to the requestIdToken method. To find the OAuth 2.0 client ID: Open the Credentials page in the API Console. The Web application type client ID is your backend server's OAuth 2.0 client ID.

Then add the following code to initiate Google sign in.

//getting the google signin intent
Intent signInIntent = mGoogleSignInClient.getSignInIntent();
//starting the activity for result
startActivityForResult(signInIntent, RC_SIGN_IN);

Add the onActivityResult as shown below

@Override
public void onActivityResult(int requestCode, int resultCode, Intent data) {
 super.onActivityResult(requestCode, resultCode, data);

 //if the requestCode is the Google Sign In code that we defined at starting
 if (requestCode == RC_SIGN_IN) {

  //Getting the GoogleSignIn Task
  Task task = GoogleSignIn.getSignedInAccountFromIntent(data);
  try {
   //Google Sign In was successful, authenticate with Firebase
   GoogleSignInAccount account = task.getResult(ApiException.class);
   //authenticating with firebase
   firebaseAuthWithGoogle(account);
  } catch (ApiException e) {
   Log.v("API Exception", e.toString());
   Toast.makeText(LoginActivity.this, e.getMessage(), Toast.LENGTH_SHORT).show();
  }
 }
}

After a user successfully signs in, get an ID token from the GoogleSignInAccount object, exchange it for a Firebase credential, and authenticate with Firebase using the Firebase credential.

private void firebaseAuthWithGoogle(GoogleSignInAccount acct) {
 Log.d(TAG, "firebaseAuthWithGoogle:" + acct.getId());

 //getting the auth credential
 AuthCredential credential = GoogleAuthProvider.getCredential(acct.getIdToken(), null);

 //Now using firebase we are signing in the user here
 mAuth.signInWithCredential(credential)
                            .addOnCompleteListener(this, new OnCompleteListener() {
  @Override
  public void onComplete(@NonNull Task task) {
   if (task.isSuccessful()) {
    if (mAuth.getCurrentUser() != null) {
     startActivity(new Intent(LoginActivity.this, MainActivity.class));
     finish();
    }
   } else {
    // If sign in fails, display a message to the user.
    Log.w(TAG, "signInWithCredential:failure", task.getException());
    Toast.makeText(LoginActivity.this, "Authentication failed.",
     Toast.LENGTH_SHORT).show();
   }
  }
 });
}

If the user is authenticated with Google Plus Sign In successfully, then login screen is redirected to the next activity.

To retrieve user details like name, profile picture, mail id through Firebase, use the following snippets.

FirebaseAuth mAuth = FirebaseAuth.getInstance();
FirebaseUser user = mAuth.getCurrentUser();

assert user != null;
textName.setText(user.getDisplayName());
textEmail.setText(user.getEmail());

Picasso.get().load(user.getPhotoUrl()).into(imageView);

Here, I have used Picasso Image Loading Library to load images. To more click here.

Download Code:

You can download the full source code of the article in GitHub. If you like this article, do star the repo in GitHub. Hit like the article.

Introduction In this article, we will learn how to use  Firebase Cloud Fire Store  in Android and how to do CRUD operations with Fir...

CRUD Operations With Firebase Cloud Fire Store CRUD Operations With Firebase Cloud Fire Store

A blog about android developement

firebase


Introduction
In this article, we will learn how to use Firebase Cloud Fire Store in Android and how to do CRUD operations with Firebase Cloud Fire Store.
Getting started with Firebase
Read the following to learn how to set up the Firebase in your Android project.
Reference - https://androidmads.blogspot.in/2016/10/android-getting-started-with-firebase.html
Additionally, do the following for Cloud Firestore.
You can enable the test mode to make the database accessible to all users.
Android
At this point, the empty DB is created as shown in the figure below.
Android
Firebase Cloud Fire store
It is a flexible, scalable NoSQL cloud database to store and sync data for client- and server-side development.
Key capabilities
  • Flexibility
  • Expressive Querying
  • Real-time Updates
  • Offline Support
  • Designed to Scale
Concepts
Firestore hosted the data like NoSQL Database.
Database             ->            Collections
Table                     ->            Document
Column                ->            Field
Coding Part
I have split this part into 3 steps as in the following.
Step 1 - Creating New Project with Empty Activity.
Step 2 - Setting up the Firebase Library.
Step 3 - Implementation of CRUD with Cloud Firestore.
Step 1 - Create a new project with Empty Activity
  1. Open Android Studio and Select create a new project.
  2. Name the project as per your wish and select an Empty activity.

    Android
  3. Click finish button to create a new project in Android Studio.
Step 2 - Setting up the Firebase Library
In this part, we will see how to setup the library for the project.
1. Open your project level build.gradle file and add the following lines in dependencies
dependencies {  
    …  
    classpath 'com.google.gms:google-services:3.1.0'  
              …  
}
2. Then add the following lines in all projects in the project level build.gradle file.
allprojects {  
    repositories {  
        google()  
        jcenter()  
        maven {  
            url "https://maven.google.com"  
        }  
    }  
}
3. Then add the following lines in app level build.gradle file to apply Google services to your project.
dependencies {  
    ...  
    implementation 'com.google.firebase:firebase-firestore:11.8.0'  
}
4. Then click “Sync Now” to set up your project.
Step 3 - Implementation of CRUD with Cloud Firestore
In this part, we will see how to implement CRUD operations with Firestore.
First, we will initialize the Firestore Database.
FirebaseFirestore myDB;  
// Init FireStore  
myDB = FirebaseFirestore.getInstance();
INSERT DATA
You can insert the data to Firestore like the following.
Map data = new HashMap<>();  
data.put("task_name", edtData.getText().toString());  
myDB.collection("tasks")  
 .add(data)  
 .addOnSuccessListener(new OnSuccessListener() {  
  @Override  
  public void onSuccess(DocumentReference documentReference) {  
   toastResult("Data added successfully");  
  }  
 })  
 .addOnFailureListener(new OnFailureListener() {  
  @Override  
  public void onFailure(@NonNull Exception e) {  
   toastResult("Error while adding the data : " + e.getMessage());  
  }  
 });
Here, we created a collection named “tasks” and we inserted the data with “task_name”. The add() method automatically generates and assigns a unique alphanumeric identifier to every document it creates. If you want your documents to have your own custom IDs instead, you must first manually create those documents by calling the document() method, which takes a unique ID string as its input. You can then populate the documents by calling the set() method, which, like the add method, expects a map as its only argument.
You can set user preferred document name instead of auto generated unique identifier using the following method
myDB.collection("tasks").document("user_preferred_id").set(data)  
The following figure shows the DB after inserting the data.
Android
READ DATA
You can read the collection of data from firestore using “addSnapShotListener”. The code explains how to read data from Cloud Firestore.
myDB.collection("tasks").document("user_preferred_id").set(data)myDB.collection("tasks").addSnapshotListener(new EventListener() {  
        @Override  
        public void onEvent(QuerySnapshot documentSnapshots, FirebaseFirestoreException e) {  
            if (e != null)  
                toastResult(e.getMessage());  
            list.clear();  
            for (DocumentSnapshot doc : documentSnapshots) {  
                list.add(doc.getString("task_name"));  
            }  
        }  
    });
UPDATE DATA
You can update the record in the collection if you know the name/Id of the document. The following code shows how to update the data. Map is used to update the data with the same in the document.
Map data = new HashMap<>();  
data.put("data", edtData.getText().toString());  
myDB.collection("myData").document("1").update(data)  
        .addOnSuccessListener(new OnSuccessListener() {  
            @Override  
            public void onSuccess(Void aVoid) {  
                toastResult("Data updated successfully");  
            }  
        })  
        .addOnCompleteListener(new OnCompleteListener() {  
            @Override  
            public void onComplete(@NonNull Task task) {  
                toastResult("Data update Completed");  
            }  
        })  
        .addOnFailureListener(new OnFailureListener() {  
            @Override  
            public void onFailure(@NonNull Exception e) {  
                toastResult("Error while updating the data : " + e.getMessage());  
            }  
        });
DELETE DATA
The existing data can be deleted from Firestore using delete() function. The following code shows how to implement the delete function.
myDB.collection("myData").document("1").delete()  
    .addOnSuccessListener(new OnSuccessListener() {  
        @Override  
        public void onSuccess(Void aVoid) {  
            toastResult("Data deleted successfully");  
        }  
    })  
    .addOnFailureListener(new OnFailureListener() {  
        @Override  
        public void onFailure(@NonNull Exception e) {  
            toastResult("Error while deleting the data : " + e.getMessage());  
        }  
    });
Download Code
If you think this article is informative do like and star the repo in GitHub. You can download the full sample code here.
Demo
You can find the demo video on YouTube.

Hi Friends. In this tutorial, we will learn how to implement firebase phone authentication with it's origin. Digits is an Simple...

Firebase Phone Authentication - Example Firebase Phone Authentication - Example

A blog about android developement

firebase

Hi Friends. In this tutorial, we will learn how to implement firebase phone authentication with it's origin.

Digits is an Simple User Phone Authentication Service to create easy login experience. Now Digits is acquired by Google's Firebase and it provides free service for limited amount of authentication per month. However, if you need to sign in a very high volume of users with phone authentication, you might need to upgrade your pricing plan. See the pricing page. 

You can use Firebase Authentication to sign in a user by sending an SMS message to the user's phone. The user signs in using a one-time code contained in the SMS message.

Setup Firebase

To setup firebase in your project, read previous post. After setting up, open Authentication sign in method and enable phone authentication method.


You should Add SHA Fingerprint in your application. To get SHA Fingerprint use the following Code with Command Prompt in Windows
keytool -list -v -keystore "%USERPROFILE%\.android\debug.keystore" -alias androiddebugkey -storepass android -keypass android

Coding Part

Add the dependency for Firebase Authentication to your app-level build.gradle file:
dependencies {
    ...
    compile 'com.google.firebase:firebase-auth:11.0.0'
}
// Add to the bottom of the file
apply plugin: 'com.google.gms.google-services'
Add the dependency for Play Services to your project-level build.gradle file:
dependencies {
    ...
    classpath 'com.google.gms:google-services:3.1.0'
}

Send a verification code to the user's phone

To initiate phone number sign-in, present the user an interface that prompts them to type their phone number. Send OTP to user by pass their phone number to the PhoneAuthProvider.verifyPhoneNumber method to request that Firebase verify the user's phone number. For example,
PhoneAuthProvider.getInstance().verifyPhoneNumber(
                phoneNumber,        // Phone number to verify
                60,                 // Timeout duration
                TimeUnit.SECONDS,   // Unit of timeout
                this,               // Activity (for callback binding)
                mCallbacks);        // OnVerificationStateChangedCallbacks
mCallbacks is used to know the verification status and the callback method is implemented as in the following
mCallbacks = new PhoneAuthProvider.OnVerificationStateChangedCallbacks() {
    @Override
    public void onVerificationCompleted(PhoneAuthCredential credential) {
        Log.d(TAG, "onVerificationCompleted:" + credential);
        signInWithPhoneAuthCredential(credential);
    }

    @Override
    public void onVerificationFailed(FirebaseException e) {
        Log.w(TAG, "onVerificationFailed", e);
        if (e instanceof FirebaseAuthInvalidCredentialsException) {
            mPhoneNumberField.setError("Invalid phone number.");
        } else if (e instanceof FirebaseTooManyRequestsException) {
            Snackbar.make(findViewById(android.R.id.content), "Quota exceeded.",
                    Snackbar.LENGTH_SHORT).show();
        }
    }

    @Override
    public void onCodeSent(String verificationId,
                           PhoneAuthProvider.ForceResendingToken token) {
        Log.d(TAG, "onCodeSent:" + verificationId);
        mVerificationId = verificationId;
        mResendToken = token;
    }
};
onVerificationCompleted(PhoneAuthCredential)
This method is called, when the user number verified successfully.

onVerificationFailed(FirebaseException)
This method is called, when error occurred during verification.

onCodeSent(String verificationId, PhoneAuthProvider.ForceResendingToken)
This method is called when the verification code is send to user via SMS.

Create a PhoneAuthCredential object

The phone auth credits are created as in the following snippet
PhoneAuthCredential credential = PhoneAuthProvider.getCredential(verificationId, code);
// verificationId can be found in onCodeSent function in callback functionality
// code is retrieved from SMS send by Firebase
Then we can verify and store the Phone Authentication user details by using the following method.
mAuth.signInWithCredential(credential)
            .addOnCompleteListener(this, new OnCompleteListener() {
                @Override
                public void onComplete(@NonNull Task task) {
                    if (task.isSuccessful()) {
                        Log.d(TAG, "signInWithCredential:success");
                        FirebaseUser user = task.getResult().getUser();
                        startActivity(new Intent(PhoneAuthActivity.this, MainActivity.class));
                        finish();
                    } else {
                        Log.w(TAG, "signInWithCredential:failure", task.getException());
                        if (task.getException() instanceof FirebaseAuthInvalidCredentialsException) {
                            mVerificationField.setError("Invalid code.");
                        }
                    }
                }
            });

Sign Out

To sign out from your Application just use signout method in your Auth method.
FirebaseAuth mAuth = FirebaseAuth.getInstance();
mAuth.signOut();

Download Code:

You can download the full source from the following Github link. If you Like this tutorial, Please star it in Github.
    
Download From Github

Post your doubts and comments in the comments section.  

Firebase provides more features as described in previous post . One of the very useful feature is User Authentication. Different types o...

Firebase User Authentication in Android Firebase User Authentication in Android

A blog about android developement

firebase

Firebase User authentication
Firebase provides more features as described in previous post. One of the very useful feature is User Authentication. Different types of User Authentication are,
  1. Email and Password Authentication
  2. Google Plus Authentication
  3. Facebook Authentication
  4. Github Authentication
In this post, I will explain the way to implement Firebase Email & Password authentication. To demonstrate how simplified and easy to use Firebase is, we will build a simple login / register (Firebase Authentication) demo. This separates sensitive user credentials from your application data, and lets you focus on the user interface and experience for your Application. It is suitable for Simple, Easy and Perfect way of handling Login, Registration, Forget Password and so on.

The Feature and Settings up of Application in Application is Explained in Previous post. After creating the project, Enable Firebase Email & Password authentication by selecting Authentication in Left Pane in Firebase Console and Go to Sign-in-Method as in the following Image.

Enable Authentication

I. Creating and Setting up Android Project

1. Create a new project in Android Studio from File ⇒ New Project. When it prompts you to select the default activity, select Blank Activity and proceed. While filling the project details, use the same package name which you gave in Firebase console.

2. Open AndroidManifest.xml and add the INTERNET permission as we need to make network calls.
<uses-permission android:name="android.permission.INTERNET" />

3. Paste the google-services.json file to your project’s app folder. This step is very important as your project won’t build without this file.

4. Now open the build.gradle located in project’s home directory and add firebase dependency.
build.gradle
dependencies {
 classpath 'com.android.tools.build:gradle:2.1.2'
 classpath 'com.google.gms:google-services:3.0.0'
}
5. Open app/build.gradle and add firebase auth dependency. At the very bottom of the file, add apply plugin: ‘com.google.gms.google-services’
app/build.gradle
dependencies {
    compile "com.google.firebase:firebase-auth:9.0.2"
}
apply plugin: 'com.google.gms.google-services'

II. Coding Part

1. Sign Up Method:

In Firebase Authentication, the credits entered by user might have some validation. For Example, Email ID might be in Proper email format and Password must have at-least 6 character. Firebase Provides createUserWithEmailAndPassword() to create New User in Firebase.
// Validating Credits entered by User with Firebase
btnSignUp.setOnClickListener(new View.OnClickListener() {
 @Override
    public void onClick(View view) {
  final String email = inputEmail.getText().toString();
  final String password = inputPassword.getText().toString();
  try {
   // Email ID must be valid
   // Password strength is minimum 6 characters by default in firebase registration
   // Minimum Password length throws Error as 'WEAK PASSWORD'
   if (password.length() > 0 && email.length() > 0) {
    PD.show();
    //authenticate user
    auth.createUserWithEmailAndPassword(email, password)
     .addOnCompleteListener(RegisterActivity.this, new OnCompleteListener() {
      @Override
      public void onComplete(@NonNull Task task) {
      if (!task.isSuccessful()) {
       Toast.makeText(
       RegisterActivity.this,
       "Authentication Failed",
       Toast.LENGTH_LONG).show();
      } else {
       Intent intent = new Intent(RegisterActivity.this, MainActivity.class);
       startActivity(intent);
       finish();
      }
      PD.dismiss();
     }
    });
   } else {
     Toast.makeText(
      RegisterActivity.this,
      "Fill All Fields",
      Toast.LENGTH_LONG).show();
   }

  } catch (Exception e) {
   e.printStackTrace();
  }
 }
});

2. Sign In Method:

Firebase provides signInWithEmailAndPassword() method to sign in the user.
// Validating Login Credits with Firebase
btnLogin.setOnClickListener(new View.OnClickListener() {
 @Override
 public void onClick(View view) {
  final String email = inputEmail.getText().toString();
  final String password = inputPassword.getText().toString();
  try {
   if (password.length() > 0 && email.length() > 0) {
    PD.show();
    // Authenticate user
    auth.signInWithEmailAndPassword(email, password)
      .addOnCompleteListener(LoginActivity.this, new OnCompleteListener() {
       @Override
       public void onComplete(@NonNull Task task) {
        if (!task.isSuccessful()) {
         Toast.makeText(
           LoginActivity.this,
           "Authentication Failed",
           Toast.LENGTH_LONG).show();
         Log.v("error", task.getResult().toString());
        } else {
         Intent intent = new Intent(LoginActivity.this, MainActivity.class);
         startActivity(intent);
         finish();
        }
        PD.dismiss();
       }
      });
   } else {
    Toast.makeText(
      LoginActivity.this,
      "Fill All Fields",
      Toast.LENGTH_LONG).show();
   }
  } catch (Exception e) {
   e.printStackTrace();
  }
 }
});

3. Forget Password:

Firebase provides sendPasswordResetEmail() method to reset password. Automatically, Reset Password email send to your entered email. To reset password, Click the link in your email. We can customize the Email Template.
// Method to Reset Password or Forget Password Option
auth.sendPasswordResetEmail(modeStr).addOnCompleteListener(new OnCompleteListener() {
 @Override
 public void onComplete(@NonNull Task task) {
  if (task.isSuccessful()) {
   Toast.makeText(ForgetAndChangePasswordActivity.this, "We have sent you instructions to reset your password!", Toast.LENGTH_SHORT).show();
  } else {
   Toast.makeText(ForgetAndChangePasswordActivity.this, "Failed to send reset email!", Toast.LENGTH_SHORT).show();
  }
  PD.dismiss();
 }
});

4. Change Username or Password:

Firebase provides updatePassword() to change password and updateEmail() to change Email ID.
// Method to change Password Option
user.updatePassword(modeStr)
 .addOnCompleteListener(new OnCompleteListener() {
  @Override
  public void onComplete(@NonNull Task task) {
   if (task.isSuccessful()) {
    Toast.makeText(ForgetAndChangePasswordActivity.this, "Password is updated!", Toast.LENGTH_SHORT).show();
   } else {
    Toast.makeText(ForgetAndChangePasswordActivity.this, "Failed to update password!", Toast.LENGTH_SHORT).show();
   }
   PD.dismiss();
  }
 });
 
// Method to Change Email or Username Option
user.updateEmail(modeStr)
 .addOnCompleteListener(new OnCompleteListener() {
  @Override
  public void onComplete(@NonNull Task task) {
   if (task.isSuccessful()) {
    Toast.makeText(ForgetAndChangePasswordActivity.this, "Email address is updated.", Toast.LENGTH_LONG).show();
   } else {
    Toast.makeText(ForgetAndChangePasswordActivity.this, "Failed to update email!", Toast.LENGTH_LONG).show();
   }
   PD.dismiss();
  }
 });
 

5. Delete User or Account:

Firebase Provides delete() method to delete account.
// Method to Remove Account Option
FirebaseUser user = FirebaseAuth.getInstance().getCurrentUser();
if (user != null) {
 user.delete()
  .addOnCompleteListener(new OnCompleteListener() {
   @Override
   public void onComplete(@NonNull Task task) {
    if (task.isSuccessful()) {
     Toast.makeText(ForgetAndChangePasswordActivity.this, "Your profile is deleted:", Toast.LENGTH_SHORT).show();
    } else {
     Toast.makeText(ForgetAndChangePasswordActivity.this, "Failed to delete your account!", Toast.LENGTH_SHORT).show();
    }
    PD.dismiss();
   }
  });
}

6. Sign out Session:

Firebase provides signOut() method to Sign out from Firebase session.
// Sign-Out option
btnSignOut.setOnClickListener(new View.OnClickListener() {
 @Override
 public void onClick(View view) {
  auth.signOut();
  // this listener will be called when there is change in firebase user session
  FirebaseAuth.AuthStateListener authListener = new FirebaseAuth.AuthStateListener() {
   @Override
   public void onAuthStateChanged(@NonNull FirebaseAuth firebaseAuth) {
    FirebaseUser user = firebaseAuth.getCurrentUser();
    if (user == null) {
     startActivity(new Intent(MainActivity.this, LoginActivity.class));
     finish();
    }
   }
  };
 }
});

7. Checking User Session:

The following method is used to check User is Signed In or Not.
//Checking user is present or not
FirebaseAuth auth = FirebaseAuth.getInstance();
if (auth.getCurrentUser() != null) {
 Log.v("Session", "Signed In");
}

Download Source Code

In this, I explained each method to handle firebase Email/Password method and am not explaining the layout of each screen in this Project. For more, Details Please download whole project source from Github.

Download From Github

If you find this post is useful, Please provide star in Github and Having any trouble or doubt while using this project leave your comment.

With the latest news from Google I/O comes the new and upgraded Firebase. Firebase is a mobile platform that helps you quickly develop h...

Android Getting Started with Firebase Android Getting Started with Firebase

A blog about android developement

firebase

Android Getting Started with Firebase
With the latest news from Google I/O comes the new and upgraded Firebase. Firebase is a mobile platform that helps you quickly develop high-quality apps, grow your user base, and earn more money. Firebase is made up of complementary features that you can mix-and-match to fit your needs.
Features of Firebase:
Firebase comes with bunch features essential for every android app starting from authentication to hosting the app.
Advantages of using Firebase:
  1. Super easy and quick to implement.
  2. No server side configuration needed. No PHP Scripts and No Database Designs.
  3. Realtime update without using GCM.
  4. Autoscaling built-in
  5. Can start for free (only need to start paying once we hit 50 connections)
  6. Robust APIs for Javascript (including several frameworks like Angular), iOS, and Android
  7. Built-in support for authentication services like Facebook, Google, and Twitter
  8. Declarative Security Rules model allows us to enforce read/write privileges and data validation throughout the tree
Disadvantages of using Firebase:
  1. Need to build indexes manually
  2. May need to build “event log” manually as well (in separate sub-tree?)
  3. Implementation of REST API could be difficult on embedded platforms
  4. Data validation rules do not support complex objects directly (you’d need to validate individual child nodes separately)

Setting up Firebase Project:
In this post, I explained how to setup firebase for your Android Project. This method is common for all type of services offered by Firebase such as User Authentication, Realtime Database, Cloud Messaging and so on. Do the following steps for setting up your project and it is common for all services in firebase.
  1. First thing you need to do is go to https://firebase.google.com/ and make an account to gain access to their console. After you gain access to the console you can start by creating your first project.
  2. Give the package name of your project (for example FirebaseSample) in which you are going to integrate the Firebase. It redirects to Firebase Dashboard.
  3. Here, you select your project type and Here I selected Android Project.
  4. Then paste your package name as in your manifest file.(com.example.firebase).
  5. Now the google-services.json file will be downloaded when you press add app button
  6. Add this file to your app folder of your Project.

Steps to setup Firebase

Steps to setup Firebase


Steps to setup Firebase


It is common to all services in Firebase, Only the application's specification are differing based on the Gradle Dependencies. The Services offered by Firebase and their Integration to android application are demonstrated in further posts.